

Showit SEO Guide
The Complete Showit SEO Guide & Checklist
A deep, no-fluff guide to ranking a Showit website — written for designers, agency owners, and DIY founders. Includes a 75-point checklist with step-by-step walkthroughs for every item.
- Part 1 — How SEO Works on Showit
- Part 2 — The 75-Point Checklist
- Part 3 — Step-by-Step Guides
- Part 4 — FAQ
- 1.1 Showit + WordPress Architecture
- 1.2 Page Titles
- 1.3 Meta Descriptions
- 1.4 Page URLs & Slugs
- 1.5 OG / Share Image
- 1.6 Favicon
- 1.7 Heading Structure (H1–H6)
- 1.8 Image SEO & Alt Text
- 1.9 Internal & External Linking
- 1.10 Schema Markup
- 1.11 Mobile Canvas SEO
- 1.12 Site Speed & Core Web Vitals
- 1.13 Indexing, Sitemap & robots.txt
- 1.14 Canonical URLs
- 1.15 Blog SEO via WordPress
- 1.16 AEO — AI Search Optimization
- 1.17 Local SEO Fundamentals
Before you touch a single setting, you need to understand how Showit actually serves a website to Google. Most "Showit SEO" advice fails because people treat Showit like Squarespace or WordPress. It is not either of those. It is a hybrid, and the hybrid is where 90% of ranking issues come from.
1.1 The Showit + WordPress Architecture
A Showit site is really two systems glued together:
- The Showit Design App — handles your main pages: Home, About, Services, Contact, Portfolio, landing pages. These are pure Showit pages, edited on a visual canvas.
- WordPress (optional, on Tier 2+ plans) — handles your blog. Every blog post, blog index, category page, tag page, and author page is rendered by WordPress, not Showit.
This matters because the two systems have completely different SEO controls:
- For Showit pages, you set SEO inside the Showit Design App's SEO Settings panel.
- For blog posts and blog templates, you set SEO inside WordPress, usually via the Yoast SEO or Rank Math plugin.
Showit also auto-generates a sitemap at yourdomain.com/siteinfo.xml for the Showit pages, and Yoast generates a separate sitemap (typically yourdomain.com/sitemap_index.xml) for the WordPress blog. Both must be submitted to Google Search Console.
1.2 Page Titles (Title Tags)
The page title is the clickable blue link in Google search results. It is the single most important on-page SEO element — for both ranking and click-through rate.
- Length: Aim for 50–60 characters. Google truncates around 580 pixels.
- Format: Put the primary keyword near the front. End with your brand name on most pages.
- Example (service page): Showit Website Designer for Photographers | Adil Makhdoom
- Example (home page): Adil Makhdoom – Showit & SEO Designer in Lahore
- Uniqueness: Every page needs a unique title. Duplicate titles dilute relevance and confuse Google.
<head> and is invisible to visitors — you only see it in the browser tab and in Google results.In Showit, this is the Page Title field inside SEO Settings — not visible text on your canvas.
→ Guide: How to set the Page Title in Showit1.3 Meta Descriptions
The meta description is the short snippet under the blue link in Google. It does not directly influence ranking, but it heavily influences click-through rate, which indirectly influences ranking.
- Length: 140–160 characters. Google may rewrite if it's too short or irrelevant.
- Include: Primary keyword, a clear value proposition, a soft call-to-action.
- Tone: Write to the human, not the algorithm. Treat it as ad copy.
Every Showit page has its own Meta Description field, right under the Page Title in SEO Settings.
→ Guide: How to write and set Meta Descriptions1.4 Page URLs and Slugs
The URL slug is the part of the URL after your domain. yoursite.com/showit-website-designer has a slug of showit-website-designer.
- Lowercase only.
- Hyphens between words — never underscores or spaces.
- 3–5 words max. Shorter is better.
- Include the primary keyword.
- No stop words (the, and, of, a) unless essential for meaning.
- No dates, IDs, or random numbers.
/page-2-final-v3-2024✅ Good:
/showit-seo-servicesURL changes break links. Once indexed, do not change a URL without setting up a 301 redirect first.
→ Guide: How to set the Page URL/Slug in Showit1.5 OG Image / Social Share Image
When someone shares your URL on Facebook, LinkedIn, WhatsApp, Slack, or iMessage, the platform pulls a preview card using the OG image you set.
- Why it matters: A well-designed OG image can 3–5× your click-through rate from social shares. Without one, the platform grabs a random, badly cropped image.
- Dimensions: 1200 × 630 pixels (1.91:1 ratio) — the Facebook/LinkedIn standard.
- File size: Under 1 MB.
- Format: JPG (smaller) or PNG (sharper text).
- Design tip: Include your logo, the page title, and a clean focal image — readable at thumbnail size.
Set this per page in Showit's SEO Settings → Share Image field. Blog post share images are set inside WordPress as the post's Featured Image.
→ Guide: How to set the OG / Share Image1.6 Favicon
The favicon shows up in browser tabs, bookmarks, and Google search results next to your URL on mobile. No direct ranking impact, but it dramatically affects brand trust and CTR in mobile SERPs.
- Specs: 32 × 32 pixels, PNG format, square.
- Design: Usually a single letter, monogram, or simplified logo mark — not the full wordmark.
- Use favicon.io to generate one from a logo or letter.
The favicon is global — set once in Site Settings, applies to every page.
→ Guide: How to set the Favicon1.7 Heading Structure (H1–H6)
Headings tell Google — and screen readers, and humans skimming the page — the structure of your content. They are semantic HTML tags, not just visual styles.
- One H1 per page. Always. The H1 is the page's main title. It should contain the primary keyword. Multiple H1s confuse Google and break accessibility.
- H2 for major sections. H3 for sub-sections inside H2s.
- Never skip levels. Don't go H1 → H3.
- Don't use headings just to make text bigger — that's what font sizes are for.
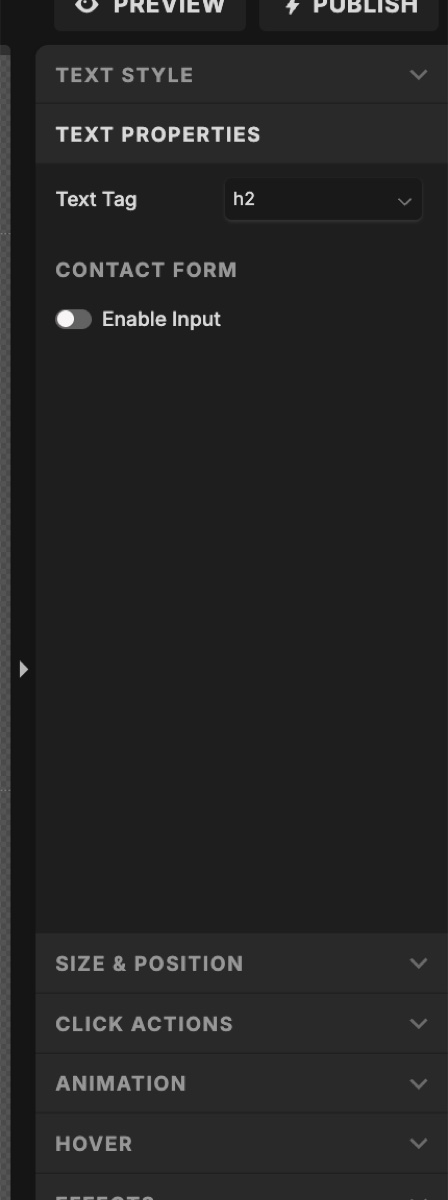
The Text Tag dropdown lives inside the Text Properties panel on the right when a text box is selected.
1.8 Image SEO and Alt Text
Every image on your site is an SEO opportunity. Showit-heavy sites are image-heavy by nature, which makes this even more important.
The three image SEO levers
- File name (before uploading):
showit-website-designer-lahore.jpg, notIMG_4521.jpg. Lowercase, hyphens, descriptive. - Alt text (after uploading): A natural-language description of the image. Showit calls this the SEO Description in the image properties panel.
- File size: Compress before uploading. Under 200 KB for hero images, under 100 KB for everything else. Use TinyPNG, Squoosh, or ShortPixel.
Alt text rules
- Describe what's in the image, not what you wish it ranked for.
- Don't keyword-stuff. "Showit website designer Showit SEO Lahore Showit expert" is spam.
- Don't write "image of…" or "photo of…" — screen readers already say that.
- Decorative images (dividers, background patterns) can have empty alt text.
Gallery images in Showit have their alt text set per-image inside the gallery's image list — same panel as the Image Title.
→ Guide: How to add alt text to images and galleries1.9 Internal & External Linking
Links are still one of Google's core ranking signals. Most Showit sites under-link internally and over-link externally.
Internal linking
- Every important page should be reachable in 2 clicks from the home page.
- Use descriptive anchor text. "Showit SEO services" beats "click here."
- Link from blog posts to service pages. This passes link equity to pages that convert.
- 3–8 internal links per long-form post is healthy.
External linking
- Linking out to authoritative sources actually helps SEO. It signals you've done research.
- Set affiliate or sponsored external links to
rel="nofollow"orrel="sponsored". - Always open external links in a new tab. Internal links in the same tab.
In Showit, links are set via Click Actions on any element. Action types include: Site Page (internal), Web URL (external), Anchor Tag, Email, and Phone.
→ Guide: How to add internal and external links in Showit1.10 Schema Markup (Structured Data)
Schema markup is invisible code that tells Google what your content is — not just "here's some text" but "here's a service, priced at $X, offered in Lahore, by a business with these reviews."
Why it matters more than ever
- Rich snippets in Google (star ratings, FAQs, price ranges, breadcrumbs) all come from schema.
- AI Overviews, Perplexity, ChatGPT, and Google's AI Mode all preferentially cite content with clean structured data.
- Local businesses without LocalBusiness schema get crushed in local pack results.
Schema types every Showit site should consider
| Page | Schema Type |
|---|---|
| Home | ProfessionalService or LocalBusiness |
| About | Person (for solo brand) |
| Each service page | Service |
| Pages with FAQs | FAQPage |
| Contact | LocalBusiness (if local) |
| Blog posts | Article / BlogPosting (Yoast/Rank Math auto-handles) |
Showit doesn't have a native schema builder. You add it as JSON-LD code, pasted into the Custom Head HTML field — either site-wide (Site Settings → Integrations) or per page (Page → Advanced Settings → Custom Head HTML).
Generate the JSON-LD with a free tool like TechnicalSEO.com Schema Generator or Schema App, then paste the output into Showit.
→ Guide: How to add Schema Markup in Showit1.11 Mobile Canvas SEO — The Showit-Specific Trap
This is the single most overlooked Showit SEO issue. Google uses mobile-first indexing. Your mobile canvas is the one Google reads for ranking — not your desktop canvas.
Showit gives you two separate canvases per page. They can have different text, different headings, different images, different elements entirely. If they're out of sync, you have a serious problem.
Common mobile-only SEO mistakes
- Important paragraphs hidden on mobile to "clean up the design." Google treats that content as missing.
- The H1 on desktop is a beautiful display headline. On mobile, the same text is a Paragraph tag.
- Alt text was added to desktop images, but the mobile canvas uses a different image with no alt text.
- The mobile menu uses a hamburger that opens a hidden canvas — and the menu items inside have no link click actions.
1.12 Site Speed & Core Web Vitals
Google's Core Web Vitals (LCP, INP, CLS) are real ranking factors. Showit sites can be fast, but the platform's design freedom makes it easy to build slow ones.
Most common speed killers on Showit
- Uncompressed images. A single 4 MB hero image can tank your Largest Contentful Paint.
- Auto-playing video backgrounds on mobile.
- Too many custom fonts — each font weight is a separate HTTP request.
- Heavy third-party embeds (Calendly, Typeform, Instagram feeds, multiple analytics scripts).
- Massive canvases on mobile — a 10,000px-tall canvas with 30 elements on a mid-range Android phone is slow.
How to measure
- PageSpeed Insights — official Core Web Vitals scores from Google's CrUX data.
- GTmetrix — good for waterfall analysis.
- Chrome DevTools → Lighthouse → Mobile.
1.13 Indexing, Sitemap & robots.txt
Indexing means Google has crawled your page and added it to its database. If a page is not indexed, it cannot rank. Period.
- Showit auto-generates a sitemap at
yourdomain.com/siteinfo.xml. - The WordPress blog uses Yoast/Rank Math to generate its own sitemap at
yourdomain.com/sitemap_index.xml. - robots.txt is automatically handled by Showit. You don't get to edit it directly.
- Each Showit page has an "Ask Google to ignore this page" toggle inside Advanced Settings. If checked, the page gets a
noindexdirective.
Verify indexing in Google Search Console by pasting the URL into the top bar.
→ Guide: How to submit your sitemap and check indexing1.14 Canonical URLs
A canonical URL is a tag that tells Google "this is the official version of this page." It prevents duplicate content issues when the same content is reachable via multiple URLs.
Showit automatically sets canonical URLs for each page. You normally don't need to do anything. The only times this matters:
- You're running a paid landing page with UTM parameters and want to canonicalize it to the clean URL.
- You have a syndicated blog post that originally appeared elsewhere — set the canonical to the original source.
For the WordPress blog, Yoast/Rank Math handles canonicals automatically and lets you override them per-post.
1.15 Blog SEO via WordPress
Your blog is your SEO engine. Showit pages tend to be static. Blog posts are where you target long-tail keywords, build topical authority, and earn backlinks.
The setup
- Install Yoast SEO or Rank Math in WordPress. (Yoast comes pre-installed on Showit's basic blog plans.)
- Configure the plugin: site name, social profiles, default title/meta templates, schema (Person vs Organization).
- For every post: set the focus keyphrase, write a custom SEO title, write a custom meta description, set the slug, upload a featured image with alt text, and use proper H1/H2/H3 structure.
Blog content strategy
- Pillar pages (long, comprehensive guides) target broad head keywords.
- Cluster posts (shorter, specific) target long-tail keywords and link back to the pillar.
- Internal link from every cluster post to the pillar, and from the pillar to every cluster.
1.16 AEO — Optimizing for AI Search
Search is changing. Perplexity, ChatGPT, Claude, Google's AI Mode, and Bing Copilot answer questions directly — often citing 3–5 sources. To get cited, your content needs to be structured for extraction.
What AI search engines look for
- Clear question-and-answer formatting. Use H2s/H3s phrased as actual questions.
- Direct answers in the first 1–2 sentences under each heading. The model needs a clean snippet to pull.
- Structured data — FAQ, How-To, and Article schema are heavily used.
- Author bylines and dates. AI engines weight E-E-A-T (Experience, Expertise, Authoritativeness, Trustworthiness) heavily.
- Tables, lists, and definitions. Easy for an LLM to parse.
- Original data, opinions, examples, screenshots. Generic regurgitated content gets ignored.
Practical Showit moves
- Add an FAQ section at the bottom of every important page, marked up with FAQ schema.
- Use the pattern: question as H3, answer as the next paragraph.
- Add author bio canvases to blog posts (Yoast can render Person schema).
- Publish original research, case studies, and before/after comparisons.
1.17 Local SEO Fundamentals
If you serve a specific city or region, local SEO multiplies your visibility.
The five local SEO pillars
- Google Business Profile — free, verify it, fill out everything, post weekly.
- NAP consistency — your business Name, Address, and Phone must be identical across your website, Google Business Profile, social profiles, and directory listings.
- LocalBusiness schema on your home page and contact page.
- Location-specific landing pages — if you serve multiple cities, build one page per city.
- Reviews — real reviews on Google Business Profile, optionally marked up with Review schema.
Work through this top to bottom on a new site, or use it as an audit on an existing site. Click any item to mark it done.
- 1. Confirm your domain is connected and SSL is active (HTTPS). → Guide
- 2. Decide on www vs. non-www and stick to it across all marketing. → Guide
- 3. Set your favicon (32 × 32 PNG) in Site Settings. → Guide
- 4. Set a default site-wide social share image. → Guide
- 5. Install Google Analytics 4 (GA4) via Site Settings → Integrations. → Guide
- 6. Verify your site in Google Search Console. → Guide
- 7. Verify your site in Bing Webmaster Tools (powers ChatGPT search). → Guide
- 8. Submit your Showit sitemap (/siteinfo.xml) to Search Console. → Guide
- 9. Submit your blog sitemap (/sitemap_index.xml) to Search Console (if you have WordPress). → Guide
- 10. Set up a 301 redirect plan for any old URLs from a previous site. → Guide
- 11. Write a unique, keyword-optimized Page Title (50–60 characters) for every page. → Guide
- 12. Write a unique, compelling Meta Description (140–160 characters) for every page. → Guide
- 13. Set a clean, keyword-rich Page URL slug (lowercase, hyphens, 3–5 words). → Guide
- 14. Upload a custom Share Image (1200 × 630 px) for every important page. → Guide
- 15. Verify "Ask Google to ignore this page" is unchecked for every page you want ranked. → Guide
- 16. Set noindex on thank-you pages, hidden landing pages, and duplicate test pages. → Guide
- 17. Do keyword research for every page using Semrush, Ahrefs, Ubersuggest, or Google Keyword Planner. → Guide
- 18. Map one primary keyword + 2–3 secondary keywords to each page. Don't target the same keyword on two pages.
- 19. Set exactly one H1 per page, containing the primary keyword. → Guide
- 20. Use H2s for major sections, H3s for subsections. Never skip levels. → Guide
- 21. Confirm headings are correct on both desktop and mobile canvases. → Guide
- 22. Write body copy that genuinely answers what the searcher is looking for. Minimum 300 words per Showit page, 1,000+ for pillar blog posts.
- 23. Naturally include primary and secondary keywords in the first 100 words.
- 24. Add an FAQ section to your most important pages. → Guide
- 25. Rename image files before uploading (e.g. showit-seo-services-lahore.jpg). → Guide
- 26. Compress every image to under 200 KB (hero) or 100 KB (other) before upload. → Guide
- 27. Add alt text (SEO Description) to every meaningful image. → Guide
- 28. Add alt text to every image inside Showit galleries individually. → Guide
- 29. Leave alt text empty on purely decorative images.
- 30. Avoid auto-playing video backgrounds on mobile.
- 31. Every important page should be reachable in 2 clicks from the home page. → Guide
- 32. Add 3–8 internal links from each blog post to other relevant pages. → Guide
- 33. Use descriptive anchor text. No "click here." → Guide
- 34. Set external links to open in a new tab. → Guide
- 35. Add nofollow to affiliate or sponsored links.
- 36. Audit for broken links monthly using Ahrefs Broken Link Checker or Dr. Link Check.
- 37. Run PageSpeed Insights on home page, key service pages, and a blog post. Aim for 70+ mobile, 90+ desktop. → Guide
- 38. Address any Core Web Vitals warnings (LCP, INP, CLS). → Guide
- 39. Customize the 404 page so visitors who land on a broken URL still convert. → Guide
- 40. Delete or unpublish placeholder/template pages you're not using — don't just hide them.
- 41. Test your site on a real mobile device (not just Showit's mobile preview).
- 42. Add LocalBusiness or ProfessionalService schema to your home page. → Guide
- 43. Add Person schema to your About page (if you're a solo brand). → Guide
- 44. Add Service schema to each service page. → Guide
- 45. Add FAQPage schema to any page with an FAQ section. → Guide
- 46. Validate all schema with Google's Rich Results Test. → Guide
- 47. Install and configure Yoast SEO or Rank Math. → Guide
- 48. Set default title and meta description templates in the plugin. → Guide
- 49. Configure the plugin's schema settings (Person vs Organization, social profiles). → Guide
- 50. For every blog post: focus keyphrase, SEO title, meta description, slug, featured image + alt text. → Guide
- 51. Install the Redirection plugin in WordPress to manage 301s and monitor 404s. → Guide
- 52. Set blog permalinks to Post name (/%postname%/) in WordPress → Settings → Permalinks.
- 53. Add FAQ sections to your most important pages. Use H3 questions + paragraph answers. → Guide
- 54. Mark FAQs up with FAQPage schema. → Guide
- 55. Open every blog post with a direct, 1–2 sentence answer to the post's title question.
- 56. Add author bylines, dates, and bio sections to blog posts. → Guide
- 57. Publish original research, opinions, case studies, or data nobody else has.
- 58. Claim and fully complete your Google Business Profile. → Guide
- 59. Ensure NAP (Name, Address, Phone) is identical on your site and Google Business Profile. → Guide
- 60. Add LocalBusiness schema with full address and geo coordinates. → Guide
- 61. Embed a Google Map on your contact page.
- 62. Build location-specific landing pages if you serve multiple cities.
- 63. Get listed on 5–10 high-quality directories relevant to your industry.
- 64. Use Screaming Frog (free up to 500 URLs) to crawl your site and find issues.
- 65. Manually request indexing for top 5 pages in Google Search Console. → Guide
- 66. Set up Google Search Console email alerts for indexing and Core Web Vitals issues.
- 67. Set up uptime monitoring (UptimeRobot, free).
- 68. Share your launch on LinkedIn, Pinterest, Instagram — early backlinks help indexing.
- 69. Monthly: Review Search Console Performance report. Find queries you almost rank for and improve those pages.
- 70. Monthly: Check for broken links and fix or redirect them.
- 71. Monthly: Publish at least 2 new blog posts targeting researched keywords.
- 72. Quarterly: Audit page speed and Core Web Vitals.
- 73. Quarterly: Refresh meta titles/descriptions on underperforming pages.
- 74. Quarterly: Audit competitors' new content and backlinks.
- 75. Annually: Full SEO audit — re-run this checklist top to bottom.
Every checklist item that requires more than a one-line action is detailed below. Bookmark this section.
3.1 How to Connect Your Domain and Confirm SSL
- In the Showit Design App, click Site Settings (left sidebar, under the Site tab).
- Find the Domain section and click Edit next to your domain. If no domain is connected, click Add a Custom Domain and step through the wizard.
- Showit will give you DNS records (an A record and/or CNAME). Add them in your domain registrar (GoDaddy, Namecheap, Cloudflare, etc.).
- Wait 24–48 hours for DNS propagation.
- Once connected, Showit automatically issues a free SSL certificate. Visit your site — the URL should start with
https://and show a padlock icon. - Decide on www vs. non-www (most modern sites use non-www). Make sure the other version 301-redirects to your chosen version — Showit's domain settings handle this for you.
- Use that exact version everywhere: Google Search Console, Analytics, social profiles, business cards.
3.2 How to Set the Favicon
- Create a 32 × 32 pixel PNG of your logo mark. Use favicon.io if you need to generate one from a letter or upload a larger logo.
- In the Showit Design App, click Site Settings in the left sidebar.
- Find the Favicon setting.
- Click Choose Image, upload your favicon file and select it.
- Preview how it looks in the browser tab.
- Click Publish in the top right of the Design App.
3.3 How to Set the OG / Social Share Image
Site-wide default
- Design a 1200 × 630 pixel image in Canva or Photoshop. Include your logo, a clear headline, and an on-brand background. Save as JPG under 1 MB.
- In Showit, open Site Settings and find the Default Share Image field.
- Upload and select your image. This will be used for any page that doesn't have a custom share image.
Per-page share image
- In the Design App, click the page name at the top of the canvas (so no canvas is selected — you should see page-level SEO Settings in the right panel).
- Scroll to Share Image and click Choose Image.
- Upload your custom 1200 × 630 image and select it.
- Publish.
Blog post share image
- In WordPress, edit the post.
- In the right sidebar, find Featured Image and click Set featured image.
- Upload your 1200 × 630 image. Add alt text. Click Update.
To test: paste your URL into Facebook's Sharing Debugger or LinkedIn's Post Inspector and click "Scrape Again" to clear the cache.
3.4 How to Install Google Analytics 4 (GA4)
- Go to analytics.google.com, create an account and a GA4 property for your domain.
- After creating the property, GA4 will show you a Measurement ID (format:
G-XXXXXXXXXX). - In the Showit Design App, open Site Settings → Integrations tab.
- Find the Google Analytics field and paste your Measurement ID. Save.
- Click Publish in the Design App.
- To verify: open your live site in an incognito window, then check GA4's Reports → Realtime view. You should see yourself as an active user within a minute.
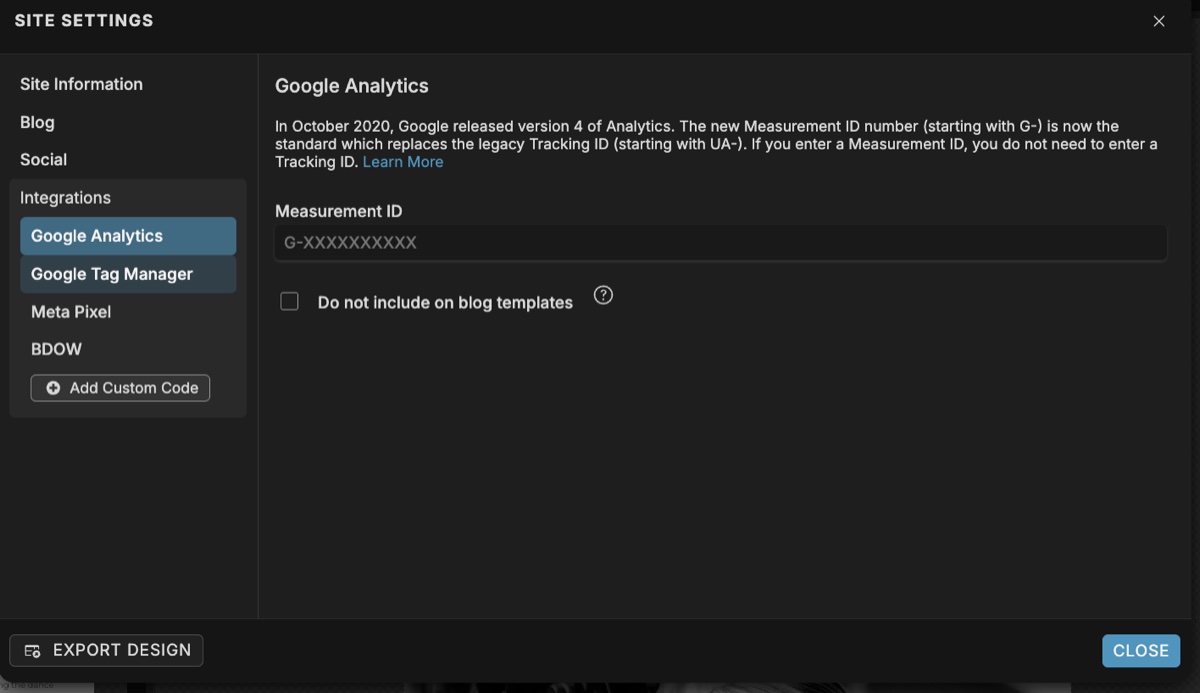
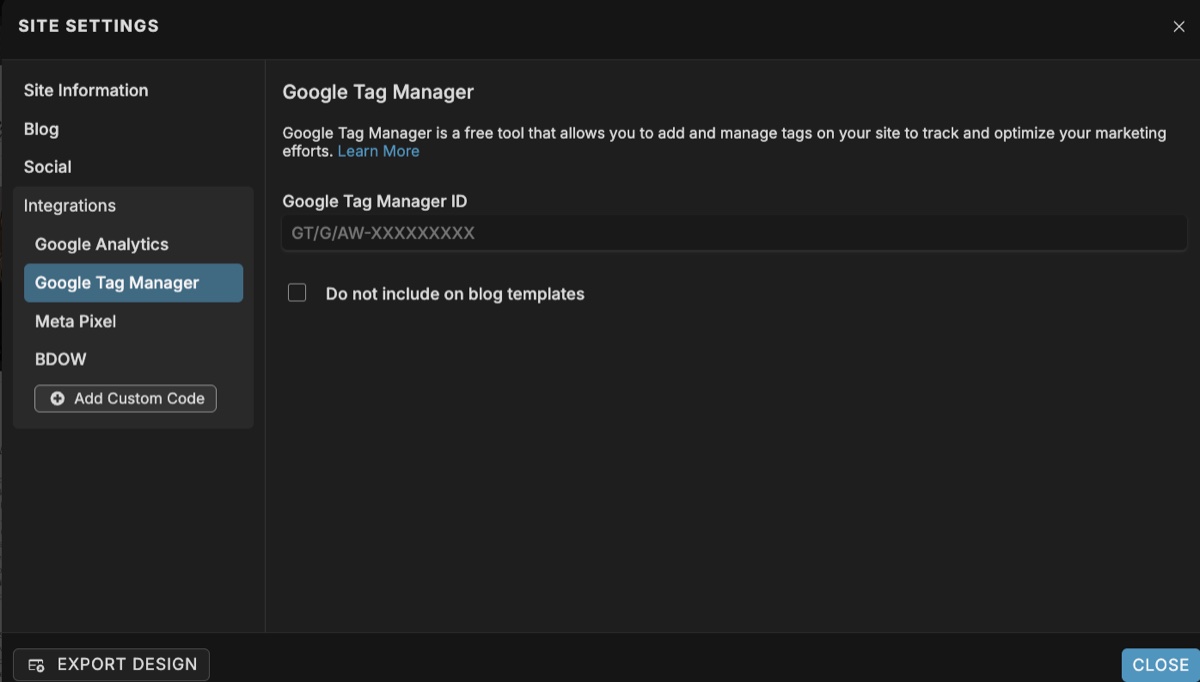
The same Integrations panel also has a field for Google Tag Manager — paste your GTM container ID there if you use GTM alongside GA4.
3.5 How to Verify in Google Search Console (and Bing)
- Go to search.google.com/search-console.
- Click Add Property and choose URL prefix.
- Enter the full URL exactly as it appears in browsers (e.g.
https://yourdomain.com— match www/non-www exactly). - Choose the HTML tag verification method. Google gives you a meta tag like
<meta name="google-site-verification" content="...">. - In Showit, open Site Settings → Integrations → + Add Custom Code. Paste the meta tag into the Head section. Save.
- Click Publish in Showit.
- Back in Search Console, click Verify. It should confirm within 30 seconds.
For Bing Webmaster Tools: go to bing.com/webmasters, import directly from Google Search Console (one-click), and you're done. Bing powers ChatGPT search — this matters.
To request indexing of a specific page
- In Search Console, paste the URL into the search bar at the top.
- Wait for the URL inspection report.
- Click Request Indexing. Google will crawl within hours to days.
3.6 How to Submit Your Sitemap
- Confirm your sitemap exists by visiting
https://yourdomain.com/siteinfo.xmlin a browser. You should see an XML page listing your pages. - In Search Console, click Sitemaps in the left sidebar.
- Enter
siteinfo.xmlin the "Add a new sitemap" field and click Submit. - If you have a WordPress blog, also submit
sitemap_index.xml(Yoast) orwp-sitemap.xml(WordPress core / Rank Math). - Wait 24–72 hours. Search Console will show "Success" and the number of discovered URLs.
3.7 How to Set Up 301 Redirects
For Showit pages
- Open Site Settings, click Edit next to your domain.
- Click the gear icon at the top right of the Update Domain window.
- In the redirect panel, enter the old page slug on the left and the destination URL on the right.
- Click Add, then Close. Publish the site.
For WordPress blog redirects
- In WordPress, go to Plugins → Add New.
- Search for Redirection (by John Godley, 2M+ installs). Install and activate.
- Go to Tools → Redirection.
- Enter the Source URL (relative, e.g.
/old-blog-post/) and Target URL (full URL). Click Add Redirect.
3.8 How to Set the Page Title
- In the Showit Design App, click your page name in the left sidebar (so the page is selected — not a canvas inside it).
- In the right sidebar, you should now see SEO Settings. If you see Canvas Settings instead, you accidentally selected a canvas — click the page name again.
- In the Page Title field, write your title in 50–60 characters.
- Format: Primary Keyword + Modifier | Brand Name. Home page exception: brand name first.
- Publish.
Title formula examples
- Home: Adil Makhdoom — Website Developer & Designer in Lahore
- Service: Showit Website Design Services | Adil Makhdoom
- Blog post: How to Add Alt Text in Showit (2026 Guide) | Adil Makhdoom
<title>. Your title should be there.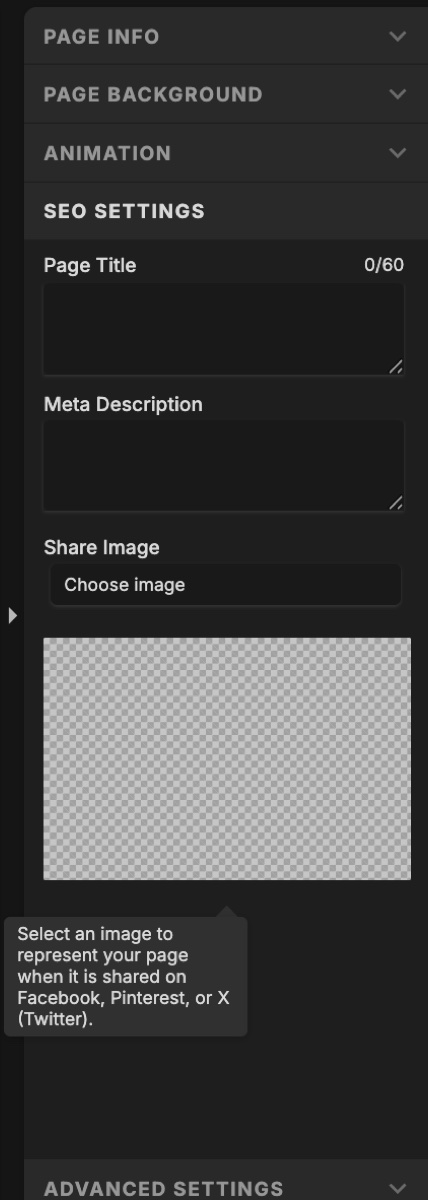
3.9 How to Write and Set Meta Descriptions
- Same place as Page Title — click the page name, then SEO Settings in the right panel.
- In the Meta Description field, write 140–160 characters.
- Structure: Hook → Value → CTA
- Naturally include the primary keyword once. Don't force it.
- Publish.
3.10 How to Set the Page URL / Slug
- Click the page name in the left sidebar.
- In the right panel, look for the Page URL field (sometimes labeled "URL Slug").
- Enter the slug in lowercase with hyphens. Example:
showit-seo-services. - Showit will warn you if the slug conflicts with another page.
- Important: Once a page is live and indexed, do not change its slug without setting up a 301 redirect first.
- Publish.
3.11 How to Use the "Ask Google to Ignore This Page" Toggle
- Click the page name in the left sidebar.
- In the right panel, click the Advanced Settings tab (next to SEO Settings).
- Find the Ask Google to ignore this page checkbox.
- Uncheck it for every page you want to rank.
- Check it for: thank-you pages, hidden landing pages, gated content pages, test pages.
- Publish.
noindex meta tag to the page's HTML head. It's one of the most common reasons Showit pages never appear in Google.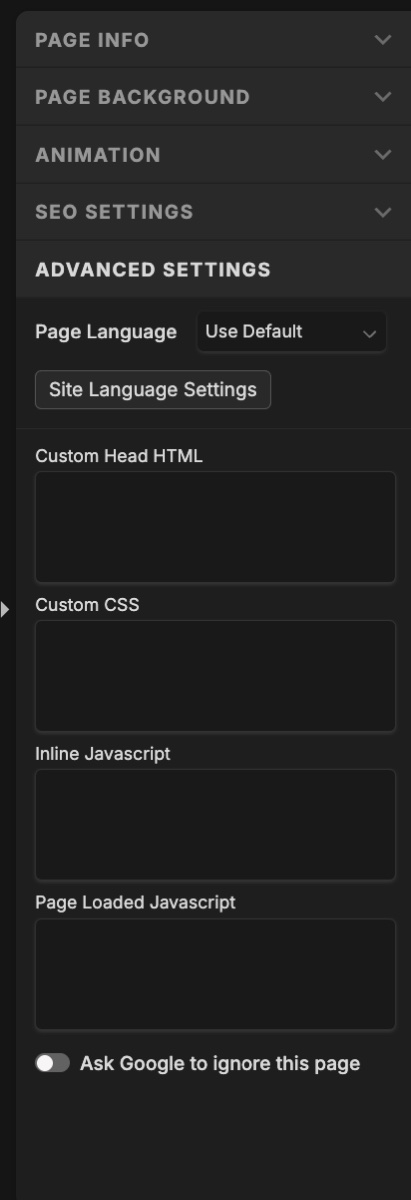
3.12 How to Do Keyword Research
- Brainstorm seed keywords. What does your ideal client type into Google? Write 10–20 phrases.
- Expand using a tool:
- Free: Google Keyword Planner, Ubersuggest, Answer the Public, Google autocomplete, "People Also Ask" boxes.
- Paid: Semrush, Ahrefs, Mangools KWFinder.
- Filter for: monthly volume (50+ for niche, 500+ for broader), Keyword Difficulty under 30 for new sites, and search intent that matches your page.
- Map keywords to pages in a spreadsheet: URL, Primary keyword, 2–3 secondary keywords, Search intent, Current ranking.
3.13 How to Set H1, H2, H3 Heading Tags in Showit
- In the Design App, click on the text box you want to tag.
- In the right panel, find the Text Properties section.
- Locate the Text Tag dropdown.
- Choose: H1, H2, H3, H4, H5, H6, Paragraph, or Navigation.
- Logic: H1 = main page title (one per page, contains primary keyword). H2 = major section headers. H3 = subsections. Paragraph = body text.
- Switch to the mobile canvas and verify the same tag is applied there too.
- Publish.
3.14 How to Add Alt Text to Images and Galleries
For a regular image on a canvas
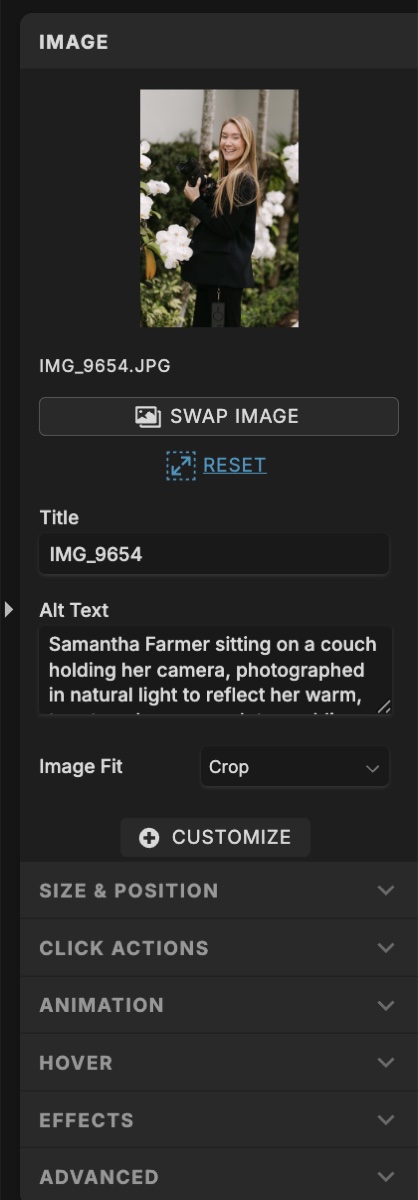
- Click the image in the Showit Design App.
- In the right panel, find the Image Properties section.
- You'll see two fields: Image Title and Alt Text.
- Image Title: Short, descriptive name. Example:
showit-portfolio-laura-wedding-photographer. - Alt Text: Write a natural 1-sentence description. Example: Showit homepage hero for Laura, a wedding photographer in Lahore.
- Save. Publish. Repeat on the mobile canvas if a different image is used there.
For images inside a Showit Gallery
- Click the gallery → in the right panel, click Gallery Images.
- Click each individual image in the list and fill in Title and Alt Text one at a time.
For WordPress blog images
- In the post editor, click the image.
- In the block sidebar, fill in the Alt text field.
3.15 How to Add Internal and External Links (Click Actions)
- Click any text, image, button, or shape on a canvas.
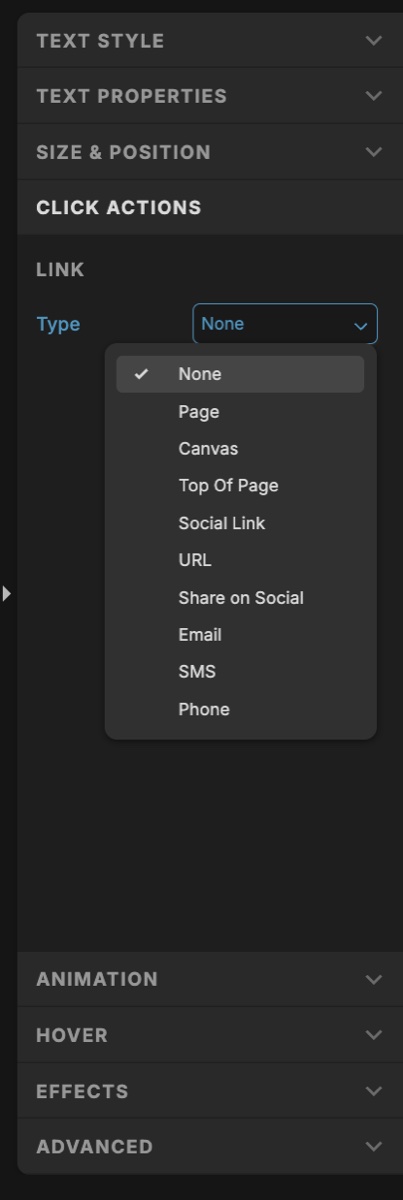
- In the right panel, find Click Actions.
- Click + Add Click Action.
- Choose the Action Type:
- Page — internal link to another page on your Showit site.
- URL — external URL. Toggle "Open in new tab" on.
- Canvas — jumps to a specific canvas on the same page.
- Email / Phone / SMS — opens email client or dialer.
- Use descriptive link text ("Read our Showit SEO guide" — not "click here").
- Repeat on the mobile canvas. Publish.
3.16 How to Add Schema Markup (JSON-LD) to Showit
Step 1 — Generate the schema
- Use TechnicalSEO.com's Schema Markup Generator or Schema App.
- Choose the schema type (LocalBusiness, Person, Service, FAQPage, etc.).
- Fill in all relevant fields (name, address, phone, hours, social profiles, etc.).
- Copy the generated JSON-LD code.
Example JSON-LD for a ProfessionalService:
Step 2 — Add to Showit site-wide
- Go to Site Settings → Integrations → + Add Custom Code.
- Paste the
<script>block into the Head section. - Save. Publish.
Step 2 (alternative) — Add to a single page
- Click the page name in the left sidebar.
- In the right panel, click Advanced Settings.
- Find Custom Head HTML and click it.
- Paste the
<script>block into the popup. Save. Publish.
Step 3 — Validate
- Go to Google's Rich Results Test.
- Paste your live URL and confirm the schema is detected with no errors.
3.17 How to Audit the Mobile Canvas for SEO
- In Showit, switch to the mobile canvas view (toggle at the top of the editor).
- For every page, verify:
- The H1 is present and tagged as H1 (click the text → Text Properties → Text Tag).
- H2s and H3s are present and tagged correctly.
- No critical body copy is hidden on mobile (check the Visibility toggle — make sure important paragraphs aren't set to "Hide on mobile").
- All images have alt text on the mobile version.
- All internal links (Click Actions) work on mobile elements.
- Test the live mobile site on a real phone — not just Chrome DevTools emulation.
- Run Google's Mobile-Friendly Test on each key URL.
3.18 How to Optimize Showit Site Speed
Images
- Compress every image before uploading. Use TinyPNG, Squoosh, or ShortPixel.
- Hero images: target under 200 KB. Other images: under 100 KB.
- Use JPG for photos, PNG for graphics with transparency, SVG for logos and icons.
- Don't upload a 4000-pixel-wide image to display at 800 pixels. Resize before uploading.
Fonts
- Limit yourself to 2 font families. Each adds load time.
- Limit weights — pick 2–3 (e.g. 400, 600, 700). Don't load all 9 weights.
Third-party embeds
- Audit your Custom Head HTML and Integrations. Remove unused scripts.
- Replace Instagram feed embeds with manually uploaded images for the home page.
- Load Calendly/Typeform only on the contact page, not site-wide.
Video
- Don't auto-play video backgrounds on mobile.
- Host videos on Vimeo or YouTube and embed — don't upload large MP4s directly.
Measure and re-test
- Run PageSpeed Insights on your home page, a service page, and a blog post.
- Fix the top "Opportunities" in the report. Re-test. Repeat.
3.19 How to Customize Your 404 Page
- In the Showit Design App's left sidebar, scroll to the Pages list. You should see a default 404 page.
- Click the 404 page and customize it: branded design, friendly headline, helpful links back to Home, Services, Blog, and Contact.
- Make sure the 404 page has "Ask Google to ignore this page" CHECKED — you don't want it indexed.
- Verify it has a proper SEO Title like Page Not Found | Brand Name.
- Publish.
3.20 How to Set Up WordPress Blog SEO (Yoast or Rank Math)
Install
- In WordPress, go to Plugins → Add New.
- Search for Yoast SEO or Rank Math. Install one (not both). Activate.
Initial configuration (Yoast)
- Click Yoast SEO in the WordPress sidebar and run the First-Time Configuration wizard.
- Set: Site type, Person or Organization (Person if solo brand), social profiles.
- Search appearance: Posts and Pages = indexed; Tags, Author archives, Date archives = no (thin content).
Per-post optimization
- Edit a blog post. Scroll to the Yoast SEO meta box.
- Fill in: Focus keyphrase, SEO title (50–60 chars), Meta description (140–160 chars), Slug.
- Set the Featured Image. Add alt text to it.
- Inside the post body, use proper H2/H3 structure.
- Link to at least 2 other relevant posts or pages on your site.
- Click Update / Publish.
Permalinks & sitemap
- Go to Settings → Permalinks in WordPress. Choose Post name (
/%postname%/). Save. - Your blog sitemap is at
yourdomain.com/sitemap_index.xml. Submit to Google Search Console and Bing Webmaster Tools.
3.21 How to Optimize for AI Search (Perplexity, ChatGPT, Google AI)
Structure content for extraction
- Open every important page with a direct, 1–2 sentence answer to the page's main question.
- Use H2s and H3s phrased as actual questions someone would type or speak into ChatGPT.
- Follow each question with a concise answer (1–3 sentences) before expanding into detail.
Add FAQ sections
- At the bottom of your home page, services page, and key blog posts, add an FAQs canvas in Showit.
- Use H3 for each question. Use paragraph text for each answer.
- Mine real questions from "People Also Ask," client emails, and Reddit threads in your niche.
- Mark the section up with FAQPage schema — see Schema guide above.
E-E-A-T signals
- Add an author byline to every blog post (Yoast/Rank Math do this automatically with Person schema).
- Add a brief author bio canvas at the bottom of blog posts with a photo and 1–2 sentence credential summary.
- Include publish dates and "Last updated" dates on every blog post.
- Link to your LinkedIn and other professional profiles from the author bio.
Original, citable content
- Publish at least one piece of original research or data per quarter.
- AI engines preferentially cite content with original data because nobody else has it.
3.22 How to Set Up Local SEO for a Showit Site
- Claim Google Business Profile and verify with postcard or video.
- Fully complete the profile: business name (exact match to your site), category, address, phone (local number), website URL, hours, service list, 10+ photos.
- NAP consistency: The Name, Address, and Phone on your Showit contact page must match Google Business Profile exactly — same abbreviations, same punctuation.
- Add LocalBusiness schema via Custom Head HTML — see Schema guide. Include address, geo coordinates, openingHours, and areaServed.
- Embed a Google Map on your contact page. In Google Maps, find your business → Share → Embed a map → copy the iframe code → paste into a Showit Embed element.
- Get reviews. Email past clients with a direct review link from your Google Business Profile dashboard. Aim for 10+ in your first 6 months.
- Local citations: get listed in 5–10 reputable directories (Yelp, BBB, industry-specific like Clutch or DesignRush for designers).
SEO is not a one-time task. It's a system. The most successful Showit sites are the ones where the designer goes through this checklist at launch, then revisits it quarterly — adjusting for new Google updates, new keywords, and new content.
Build this page as a pillar page, link to it from every blog post you write about Showit or SEO, and update it twice a year. That single pillar can drive more organic traffic than the rest of your site combined.
Last updated: May 2026 · Written by Adil Makhdoom